My Kitchen Sink Is Leaking! A Comprehensive Guide to Fixing It Yourself
Is your kitchen sink leaking? That incessant drip, drip, drip can be more than just annoying. It can lead to water damage, higher water bills, and even mold growth. But don’t panic! This comprehensive guide is designed to help you diagnose and fix that leaky kitchen sink, saving you money and preventing further problems. We’ll walk you through the common causes of leaks, step-by-step repair instructions, and preventive measures to keep your sink leak-free. You’ll gain the knowledge and confidence to tackle this common household problem. In our experience, many leaks are easily fixed with basic tools and a little know-how.
This isn’t just another quick-fix article. We aim to provide a truly in-depth resource, drawing on expert advice and practical experience to empower you to solve this problem effectively. You’ll learn not only *how* to fix the leak, but also *why* it’s happening and how to prevent it from recurring. Consider this your ultimate guide to understanding and resolving “my kitchen sink is leak” issues.
Understanding the Anatomy of Your Kitchen Sink and Why It Leaks
A kitchen sink, despite its seemingly simple design, is a complex system of pipes, drains, and connections. Understanding these components is crucial for pinpointing the source of a leak. The most common areas where leaks occur include:
* **The Faucet:** Leaks here can stem from worn-out O-rings, corroded valve seats, or loose connections.
* **The Drain:** The drain assembly, including the strainer basket, tailpiece, and P-trap, is a frequent culprit. Corrosion, loose connections, and damaged washers are common issues.
* **Supply Lines:** These flexible tubes connect the faucet to the hot and cold water supply. Leaks can occur at the connections or along the length of the hose due to wear and tear.
* **Sink Basin:** Cracks or damage to the sink basin itself are less common but can cause significant leaks.
Leaks happen for various reasons, including:
* **Wear and Tear:** Over time, rubber washers, O-rings, and other components can degrade and lose their sealing ability.
* **Corrosion:** Exposure to water and minerals can cause corrosion, weakening pipes and connections.
* **Loose Connections:** Vibrations or accidental bumps can loosen connections, creating pathways for water to escape.
* **High Water Pressure:** Excessive water pressure can strain plumbing components, leading to leaks.
* **Improper Installation:** Faulty installation of the sink or its components can create weak points that eventually fail.
Knowing these potential problem areas and causes is the first step in solving “my kitchen sink is leak” issues. Identifying the specific location of the leak is critical for effective repair.
Common Types of Kitchen Sink Leaks
Understanding the type of leak you’re dealing with can further aid in diagnosis:
* **Dripping Faucet:** A slow, persistent drip from the faucet spout, even when the faucet is turned off.
* **Under-Sink Puddle:** Water pooling under the sink, often indicating a leak in the drain assembly or supply lines.
* **Intermittent Leak:** A leak that only occurs when the faucet is turned on or when the drain is in use.
* **Spray Leak:** A forceful spray of water, typically from a damaged supply line or a loose connection.
Tools and Materials You’ll Need
Before you start any repairs, gather the necessary tools and materials. Having everything on hand will save you time and frustration.
* **Adjustable Wrench:** For tightening and loosening nuts and connections.
* **Basin Wrench:** Specifically designed for accessing hard-to-reach nuts under the sink.
* **Pliers:** For gripping and manipulating small parts.
* **Screwdrivers (Phillips and Flathead):** For removing screws from the faucet and drain assembly.
* **Plumber’s Putty:** For sealing connections around the drain strainer basket.
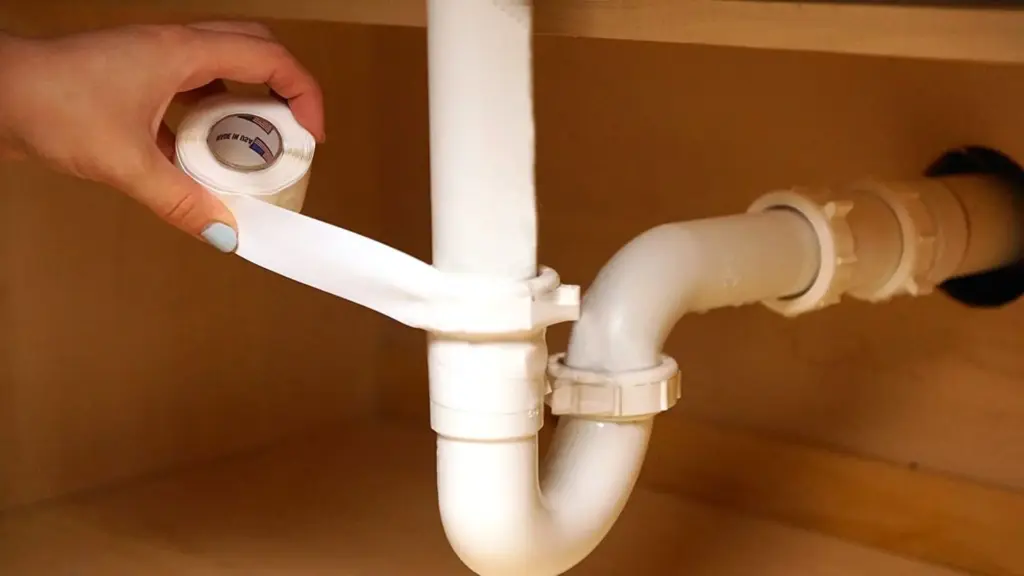
* **Teflon Tape:** For sealing threaded connections.
* **Replacement Parts:** Such as O-rings, washers, supply lines, or drain components.
* **Bucket:** To catch dripping water.
* **Towels or Rags:** For cleaning up spills.
* **Flashlight:** For illuminating dark areas under the sink.
Identifying the Source of the Leak: A Step-by-Step Guide
The key to fixing “my kitchen sink is leak” is accurately pinpointing its origin. Follow these steps to systematically identify the source:
1. **Clear the Area:** Remove everything from under the sink to provide a clear view of the plumbing.
2. **Dry the Area:** Use towels or rags to dry all surfaces under the sink. This will make it easier to spot fresh leaks.
3. **Inspect the Faucet:** Carefully examine the base of the faucet, the spout, and the handles for any signs of water leakage. Turn the faucet on and off and observe any drips or sprays.
4. **Check the Drain:** Fill the sink with water and then release the drain. Watch for leaks around the drain strainer basket, tailpiece, and P-trap.
5. **Examine the Supply Lines:** Inspect the supply lines for any signs of damage or leaks at the connections. Gently wiggle the connections to see if they are loose.
6. **Run the Dishwasher (if applicable):** If your dishwasher drains into the kitchen sink drain, run the dishwasher and check for leaks around the drain connection.
7. **Use a Mirror:** A small mirror can help you see behind pipes and connections that are difficult to access directly.
Tips for Finding Hidden Leaks
Sometimes, the source of a leak can be difficult to find. Here are some additional tips:
* **Dry Paper Towels:** Place dry paper towels under the sink and around potential leak areas. Check them periodically to see if they are wet.
* **Food Coloring:** Add a few drops of food coloring to the sink water and then drain it. This can help you trace the path of the leak.
* **Listen Carefully:** Sometimes, you can hear the sound of water dripping or spraying, even if you can’t see it.
Repairing a Leaky Kitchen Faucet
A leaking kitchen faucet is a common problem. Here’s how to fix some of the most common causes:
Replacing O-Rings and Washers
Worn-out O-rings and washers are often the culprits behind a dripping faucet. To replace them:
1. **Turn Off the Water Supply:** Locate the shut-off valves under the sink and turn them off.
2. **Disassemble the Faucet:** Follow the manufacturer’s instructions to disassemble the faucet. This may involve removing screws, handles, and other components.
3. **Identify the Worn Parts:** Look for O-rings and washers that are cracked, flattened, or otherwise damaged.
4. **Replace the Parts:** Install new O-rings and washers of the same size and shape.
5. **Reassemble the Faucet:** Carefully reassemble the faucet, following the manufacturer’s instructions.
6. **Turn on the Water Supply:** Slowly turn on the water supply and check for leaks.
Tightening Loose Connections
Sometimes, a dripping faucet is simply due to a loose connection. To tighten the connections:
1. **Turn Off the Water Supply:** As above, turn off the water supply.
2. **Locate the Loose Connection:** Identify the connection that is leaking.
3. **Tighten the Connection:** Use an adjustable wrench to gently tighten the connection. Be careful not to overtighten, as this can damage the fitting.
4. **Turn on the Water Supply:** Slowly turn on the water supply and check for leaks.
Replacing the Faucet Cartridge
If the faucet continues to leak after replacing the O-rings and washers, you may need to replace the faucet cartridge. The process varies depending on the type of faucet, so consult the manufacturer’s instructions. Generally, it involves removing the faucet handle, removing a retaining clip, and pulling out the old cartridge. Insert the new cartridge and reassemble the faucet.
Fixing a Leaky Kitchen Sink Drain
Leaks in the drain assembly are another common source of “my kitchen sink is leak” problems. Here’s how to address them:
Tightening Loose Connections on the Drain
Similar to faucet connections, drain connections can loosen over time. Tightening them is a simple fix:
1. **Clear the Area:** Remove any items stored under the sink.
2. **Dry the Area:** Thoroughly dry the drain pipes and surrounding areas.
3. **Identify the Leak:** Locate the exact point where the water is leaking from the drain assembly.
4. **Tighten the Connections:** Using an adjustable wrench or channel-lock pliers, carefully tighten the nuts and connections on the drain pipes. Be careful not to overtighten, as this can damage the pipes.
5. **Test for Leaks:** Run water into the sink and check for any remaining leaks. If the leak persists, proceed to the next step.
Replacing the Drain Strainer Basket
The drain strainer basket is the part that sits inside the sink bowl. If it’s leaking, it often means the plumber’s putty has dried out or the connections are loose. Here’s how to replace it:
1. **Turn off the water supply:** Shut off the water supply to the faucet.
2. **Disconnect the drain pipes:** Loosen the nuts connecting the drain pipes to the strainer basket and carefully remove them.
3. **Remove the old strainer basket:** Unscrew the nut holding the strainer basket in place from underneath the sink. Push the old strainer basket up and out of the sink.
4. **Clean the sink opening:** Thoroughly clean the sink opening where the new strainer basket will sit. Remove any old plumber’s putty or debris.
5. **Apply new plumber’s putty:** Roll a rope of plumber’s putty and press it around the underside of the strainer basket flange.
6. **Install the new strainer basket:** Insert the new strainer basket into the sink opening and press it firmly into the plumber’s putty.
7. **Tighten the nut:** From underneath the sink, tighten the nut that holds the strainer basket in place. Be careful not to overtighten.
8. **Reconnect the drain pipes:** Reconnect the drain pipes to the strainer basket and tighten the nuts.
9. **Test for leaks:** Run water into the sink and check for any leaks.
Replacing the P-Trap
The P-trap is the curved pipe under the sink that traps debris and prevents sewer gases from entering your home. If it’s cracked or leaking, you’ll need to replace it:
1. **Turn off the water supply:** Shut off the water supply to the faucet.
2. **Place a bucket underneath the P-trap:** This will catch any water that spills out when you remove the P-trap.
3. **Loosen the nuts:** Loosen the nuts connecting the P-trap to the drain pipes.
4. **Remove the old P-trap:** Carefully remove the old P-trap.
5. **Install the new P-trap:** Install the new P-trap, making sure the nuts are tightened securely.
6. **Test for leaks:** Run water into the sink and check for any leaks.
Addressing Leaks in the Supply Lines
The supply lines connect the faucet to the hot and cold water supply. Leaks often occur at the connections or along the length of the hose. Here’s how to fix them:
Tightening Loose Connections
As with other connections, supply line connections can loosen over time. Tightening them is the first step:
1. **Turn Off the Water Supply:** Locate the shut-off valves under the sink and turn them off.
2. **Identify the Leaking Connection:** Determine which connection is leaking.
3. **Tighten the Connection:** Use an adjustable wrench to gently tighten the connection. Be careful not to overtighten.
4. **Turn on the Water Supply:** Slowly turn on the water supply and check for leaks.
Replacing the Supply Line
If tightening the connection doesn’t stop the leak, you may need to replace the entire supply line:
1. **Turn Off the Water Supply:** Locate the shut-off valves under the sink and turn them off.
2. **Disconnect the Old Supply Line:** Use an adjustable wrench to disconnect the old supply line from the faucet and the shut-off valve.
3. **Measure the Old Supply Line:** Measure the length of the old supply line to ensure you purchase the correct size replacement.
4. **Install the New Supply Line:** Connect the new supply line to the faucet and the shut-off valve, tightening the connections securely.
5. **Turn on the Water Supply:** Slowly turn on the water supply and check for leaks.
Preventing Future Kitchen Sink Leaks
Prevention is always better than cure. Here are some tips to help prevent future kitchen sink leaks:
* **Regular Inspections:** Periodically inspect your kitchen sink plumbing for any signs of leaks or corrosion. Early detection can prevent minor problems from becoming major headaches.
* **Proper Maintenance:** Keep the sink and drain clean and free of debris. Avoid pouring harsh chemicals down the drain, as they can corrode pipes.
* **Avoid Overloading the Sink:** Avoid placing excessive weight on the sink basin, as this can stress the plumbing connections.
* **Gentle Use:** Avoid slamming cabinet doors under the sink, which can loosen connections.
* **Professional Plumbing Inspection:** Consider having a professional plumber inspect your plumbing system annually to identify potential problems before they cause leaks.
* **Check Water Pressure:** Ensure your home’s water pressure is within the recommended range (typically 40-60 PSI). Excessive water pressure can strain plumbing components.
Expert Q&A: Common Kitchen Sink Leak Questions Answered
Here are some frequently asked questions about kitchen sink leaks, answered by our plumbing experts:
1. **Q: How do I know if a small drip is something I can ignore, or if it needs immediate attention?**
**A:** Even a small drip can waste a significant amount of water over time and potentially cause water damage. It’s always best to address it promptly to prevent further problems. Ignoring it can lead to corrosion, mold growth, and higher water bills.
2. **Q: What’s the best type of plumber’s putty to use for sealing a drain strainer basket?**
**A:** A non-hardening plumber’s putty is generally recommended. It remains pliable and allows for easy removal and replacement if needed. Avoid using hardening putty, as it can be difficult to remove and may damage the sink.
3. **Q: Are flexible supply lines better than rigid copper pipes?**
**A:** Flexible supply lines are generally easier to install, especially in tight spaces. They are also less prone to cracking due to freezing temperatures. However, copper pipes are more durable and resistant to corrosion. The best choice depends on your specific needs and preferences.
4. **Q: Can I use Teflon tape on plastic drain pipes?**
**A:** While Teflon tape is commonly used on metal pipe threads, it’s generally not recommended for plastic drain pipes. Plastic drain pipes typically have compression fittings that create a watertight seal without the need for Teflon tape. Using Teflon tape on plastic threads can actually prevent the fitting from sealing properly.
5. **Q: My garbage disposal is leaking where it connects to the sink. What should I do?**
**A:** A leaking garbage disposal connection often indicates a loose mounting ring or a worn-out rubber gasket. Try tightening the mounting ring first. If that doesn’t solve the problem, you may need to replace the rubber gasket. If the disposal itself is leaking, it may need to be replaced.
6. **Q: How often should I replace my kitchen faucet?**
**A:** The lifespan of a kitchen faucet depends on the quality of the faucet and the frequency of use. A high-quality faucet can last 10-15 years or more. However, if you experience frequent leaks, corrosion, or difficulty operating the faucet, it may be time to replace it.
7. **Q: What is the purpose of the P-trap under my kitchen sink?**
**A:** The P-trap is a U-shaped pipe that traps water and prevents sewer gases from entering your home. Sewer gases can be unpleasant and even harmful, so the P-trap is an essential component of your plumbing system.
8. **Q: Is it safe to use chemical drain cleaners to unclog a slow drain?**
**A:** Chemical drain cleaners can be effective at unclogging drains, but they can also be corrosive and damage your pipes. It’s generally safer to try other methods first, such as using a plunger or a drain snake. If you do use a chemical drain cleaner, follow the instructions carefully and wear protective gloves and eyewear.
9. **Q: My kitchen sink is leaking only when I use the dishwasher. What’s the problem?**
**A:** This likely indicates a problem with the dishwasher drain hose or the connection to the garbage disposal (if applicable). Check the drain hose for cracks or leaks and ensure the connection is tight and secure. You may need to replace the drain hose or the garbage disposal connection.
10. **Q: I’ve tried everything, and my sink is still leaking. When should I call a professional plumber?**
**A:** If you’ve tried the troubleshooting steps outlined in this guide and your sink is still leaking, it’s time to call a professional plumber. A plumber has the expertise and tools to diagnose and repair more complex plumbing problems.
Conclusion: Stop the Drip and Protect Your Home
A leaky kitchen sink can be a frustrating problem, but with the right knowledge and tools, you can often fix it yourself. By understanding the anatomy of your sink, identifying the source of the leak, and following our step-by-step repair instructions, you can stop the drip, save money, and prevent further damage to your home. Remember to prioritize safety by turning off the water supply before starting any repairs. And if you’re ever unsure about something, don’t hesitate to consult a professional plumber. We hope this comprehensive guide has empowered you to tackle “my kitchen sink is leak” issues with confidence.
Now that you’re armed with this knowledge, why not share your own experiences with kitchen sink repairs in the comments below? Or, if you’re ready to take your plumbing skills to the next level, explore our advanced guide to faucet repair. For more complex plumbing issues, don’t hesitate to contact our expert team for a personalized consultation.
